更多

    校園電子告示板(二)

    上期準備 Google 試算表作資料庫,另一方面也安裝了 Apache 網頁伺服器。今期進入下一個步驟,使用 Google 試算表的 API ,以作身份認證為日後的電子告示板作保安準備。

    基於保安理由,我們不建議試算表設定為公開發佈的狀態,以免有其他未授權的人士,修改顯示的訊息。因此如有網站想向試算表索取資料時,必須要通過身份的認證,也因此意味著需要使用相關的 API 作認證管理。

    在下列的段落中,我們會講解怎樣設定 Google 試算表的 API ,而讀者若想更清楚當中的細節,可參照官方網址。

    Google Sheets API 官方網址:https://developers.google.com/sheets/api/quickstart/jsG

    以下是設定講解

    Step 1 : 先開啟試表算,並登入註冊 Google Sheets API 網址。

    註冊 Google Sheets API : https://console.developers.google.com/start/
    api?id=sheets.googleapis.com

    [row][third_paragraph]
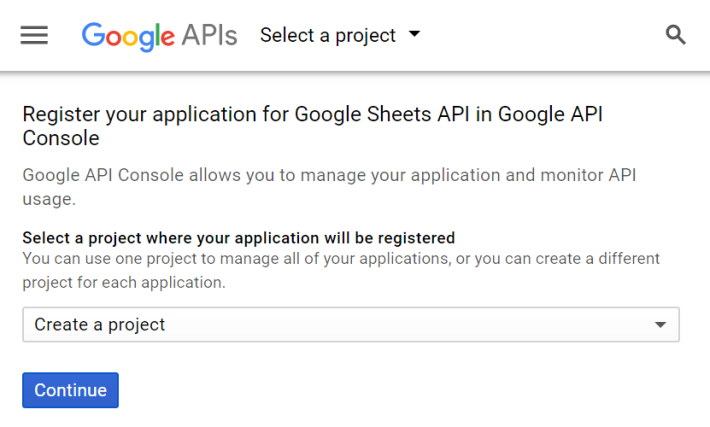
    Step 2 : 開啟 Google 試算表的 API ,並創建一個新專案,然後按下「 Continue 」。
    Step 2 : 開啟 Google 試算表的 API ,並創建一個新專案,然後按下「 Continue 」。

    [/third_paragraph][third_paragraph]

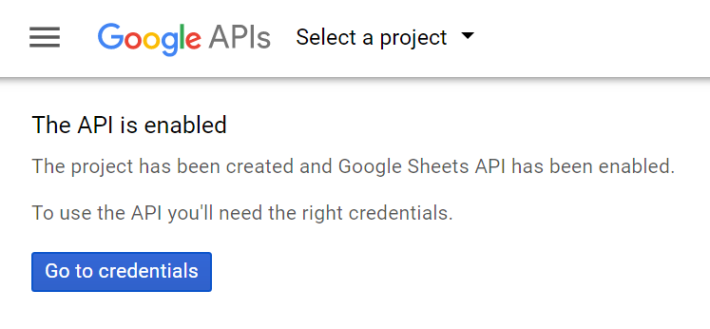
    Step 3 : 成功啟動 API 功能,然後再按下「 Go to credentials 」。
    Step 3 : 成功啟動 API 功能,然後再按下「 Go to credentials 」。

    [/third_paragraph][third_paragraph]

    Step 4 : 跳至「 Add credentials to your project 」的版面中,選擇最下面的「 Cancel 」按鈕。
    Step 4 : 跳至「 Add credentials to your project 」的版面中,選擇最下面的「 Cancel 」按鈕。

    [/third_paragraph][/row]

    [row][double_paragraph]

    Step 5 : 跟著畫面, 選擇「 OAuth consent screen 」 分頁。
    Step 5 : 跟著畫面, 選擇「 OAuth consent screen 」
    分頁。

    [/double_paragraph][double_paragraph]

    Step 6 : 選擇相關的電郵地址,並在 Product name 欄位中,輸入「 eNotice 」,接著跳至底部,按下「 Save 」按鈕。
    Step 6 : 選擇相關的電郵地址,並在 Product name 欄位中,輸入「 eNotice 」,接著跳至底部,按下「 Save 」按鈕。

    [/double_paragraph] [/row]

    [row][double_paragraph]

    Step 7 : 返回 API 的設定版面中, 選擇「 Credentials 」分頁, 再按下「 Create credentials 」按鈕,並選擇「 OAuth client ID 」。
    Step 7 : 返回 API 的設定版面中, 選擇「 Credentials 」分頁, 再按下「 Create credentials 」按鈕,並選擇「 OAuth client ID 」。

    [/double_paragraph][double_paragraph]

    Step 8 : 在 Application type 中選擇「 Web application 」,於下面「 Authorized JavaScript origins 」欄位中輸入「 https://localhost 」,然後按下「 Create 」按鈕。
    Step 8 : 在 Application type 中選擇「 Web application 」,於下面「 Authorized JavaScript origins 」欄位中輸入「 https://localhost 」,然後按下「 Create 」按鈕。

    [/double_paragraph] [/row]

    您會感興趣的內容

    相關文章